
choo choo all aboard the luck express!
Isn’t this just playing the slot machine? This isn’t Magic at all?
Why are you playing a deck that loses to itself more often than not?
LOL FINALNUB Y R U PLAYING THIS DECK ISN’T IT EZ2PLAY AND BORING?
I’ve gotten infinite variations of this, and I always reply with the same thing: There is a lot of play with this deck and a lot of micro decisions you can optimize to squeeze out percentage points. Whereas mistakes with other decks may only delay the inevitable or fasten their demise some turns down the road, mistakes with this deck manifest in the worst way possible, often losing the game on the spot. People have repeatedly told me that they tried to goldfish the deck but they can’t even beat the goldfish, or they fizzle in many different, unexpected ways, and so on. I hope to share with you what I’ve learned with regards to the in-game decisions and help you all avoid the embarrassing mistakes that have doomed me over the months.
- Mulliganing with Neoform
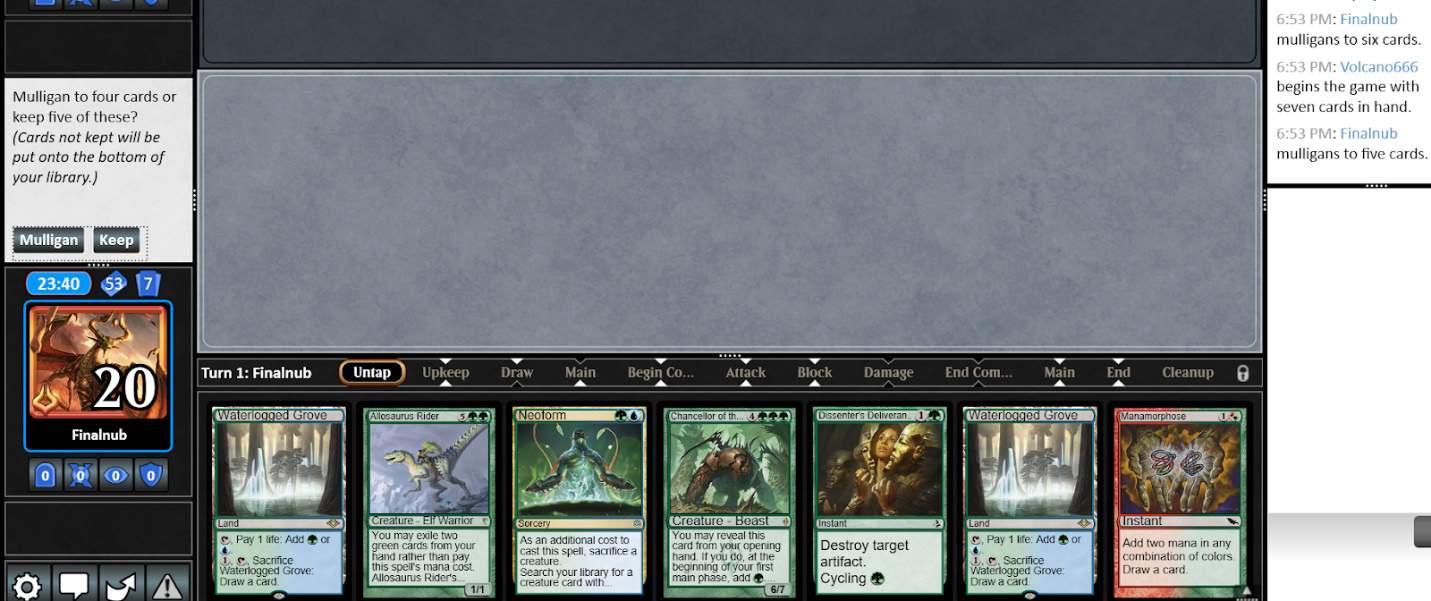
Let’s get this out of the way: I mulligan with this deck. A lot. Consider my mulligan frequency in my 200+ games with the London Mulligan:
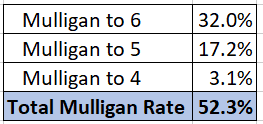
It’s both surprising and unsurprising to learn that I mulligan in over half of my games (this is almost double the rate that I had under Vancouver Mulligan). For one, the London Mulligan rule has undoubtedly helped the deck. The less obvious reason is that the post-London Mulligan metagame has been notably faster than the previous, leading me to have different target combo turns. The Turbo Hogaak deck does that to a format, unfortunately. Generally speaking, I aim for a turn 2/3 Griselbrand OTD/OTP. A lot of contextual factors change this obviously, but in general if my hand does not have a good chance to produce a Griselbrand in these turns, I’m happy taking a mulligan. This deck mulligans relatively well up until 5, and even then there are nut 5 card hands that kill on turn 1 (Chancellor, blue land, Allosaurus Rider, Neoform, green card).
It’s also important to consider the decks in the metagame and their fundamental turns against you. Understanding the matchups well will help you adjust the target combo turn appropriately. As examples:
- Against Turbo Hogaak, giving them a turn 2 is generally OK, unless their turn 1 play reveals multiple Vengevines (which are the actual cards I fear in the matchup, not Hogaak).
- Against Humans, their non-Grafdigger’s Cage hate all come in the form of 2 mana hatebears, so aim to keep hands that can get under their turn 2 threat
- Against Burn/Mono-Red Phoenix, I like to use the turn 2/3 benchmark outlined above, as against these decks a timely Griselbrand’s generally enough to get the job done
- Against Gx Tron, you are more or less safe until their Karn Liberated/Karn, the Great Creator Turn (i.e. before Tron)
- Against Valakut, you can do whatever you want until they can start pinging you with Valakut/Scapeshift you for lethal
It’s really hard to provide a rule of thumb for mulliganing, as MTG is all about context. However, if I were to summarize my mulligan philosophy in one line…:
On 6 or 7, if the hand can produce a Griselbrand by turn 2/3 OTD/OTP, keep. If your hand is one card away from doing so with some other positive things about it*, keep. Otherwise, mulligan. On 5 or less, if your hand is 1-2 cards away from a combo, keep.
*By something positive, it can mean a variety of things:
- Some of the key pieces replace themselves if you flood on them (cards with cycling, canopy lands, Manamorphoses)
- It has a Nourishing Shoal that you wouldn’t have to pitch to Allosaurus Rider (otherwise comboing becomes significantly harder)
- You have redundant combo pieces and thus are resistant to discard
- You have Serum Visions to dig deeper
- Your hand needs 1-2 things to go right but it’s absolutely crucial to get under your opponent so you’ll take your chances with an otherwise bad hand (for example, vs UW you have Chancellor, Allosaurus Rider, Neoform, Summoner’s Pact, Pact of Negation, Life Goes On on the draw and you need to hit 1 of the 13 blue sources for a clean turn 1 combo/SSG for 4 additional dirty outs if you fetch for a Wild Cantor. In this matchup, giving them 2 lands already open them up to Dovin’s Veto and Logic Knot which make the matchup significantly harder).
- Your hand has an Allosaurus Rider not a Summoner’s Pact, and thus you can safely stop if you fizzle.
- Your hand would not have to expend SSGs to combo, making the actual combo more likely to succeed
A lot of your hands will read like Yu-Gi-Oh hands rather than normal Magic hands, so you’ll need a little bit of practice to process all of these and identify which hands are good or not. Talk is cheap, so let’s run through a few examples:
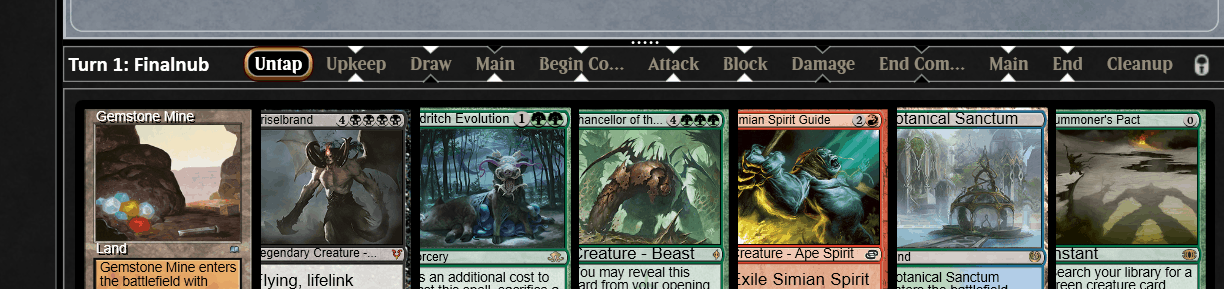
Example Hand #1: OTP vs. Hardened Scales
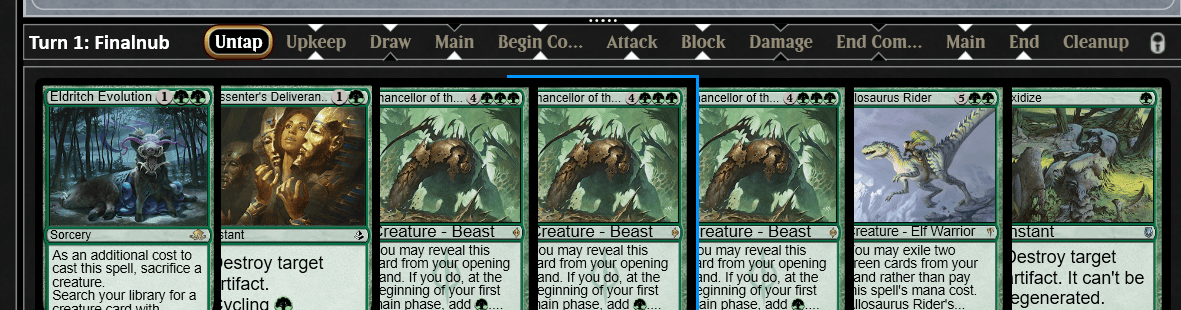
The no lands aspect may tell your brain to auto-mull, but hold up! This is a turn 1 combo on the play, as you have 3 Chancellors for enough Eldritch Evolution mana and you have an Allosaurus Rider already (bonus points for not having to Pact). Keep!
Example Hand #2: Game 2 OTD vs. Goblins
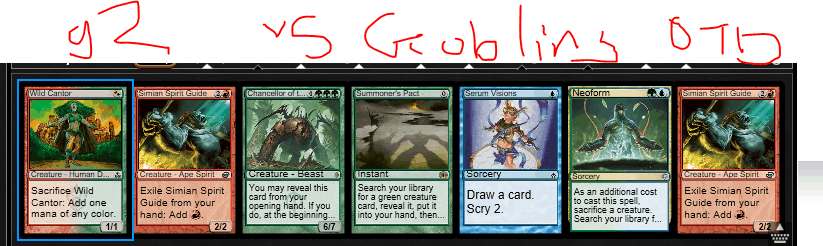
This hand technically has a potential turn 1 kill, but it’s not a clean one. You’ll have to expend an SSG (one less mana to complete the combo) to filter your SSG into Neoform Mana with the Chancellor mana. However, you’d be needing to draw a green card for this to work (32/53 in my current configuration). Plus you have to finish the kill on the same turn, as paying for a Summoner’s Pact is practically impossible. However, you can also draw an untapped blue land (13 outs) for a much more cleaner kill. So you have 32 clean-ish outs to a turn 1 combo, 13 additional outs for a cleaner turn 1 combo, and 8 actual misses. Although Goblins do not kill fast and their form of interaction is generally their 3 Thoughtseizes, I think the odds are good enough that we should keep this. Keep!
Example Hand #3: Game 1 OTP vs. an unknown who kept 7 (you have mulled to 5)
This hand is here mainly to highlight the power of the mulligan with this deck. Remember that you can always nut someone out and turn 1 kill with as little as 5 cards (4 if you are on the draw and are feeling lucky!). Here, we can bottom a land and a Dissenter’s Deliverance (Manamorphose can be useful in the library where Deliverance likely will never be). Reveal Chancellor to make a G, play Allosaurus Rider pitching Chancellor and Deliverance, and Neoform with the land and Chancellor mana. And voila, a turn 1 combo on a mulligan to 5! Keep, put back land and Manamorphose!
Example Hand #4: Game 1 OTP vs. an unknown who kept 7
This is very close to a turn 1 kill.. It’s missing a green card, unfortunately. As such, we should view this as a potential turn 2 hand that is missing a green card. Neither the Eldritch (mana intensive) or the Summoner’s Pact (need to pay for the Pact or win on the spot) or the Griselbrand (every draw is going to come attached with a 2% chance to lose on the spot if you draw the other Griselbrand) is ideal. Because this still has turn 2 potential and the one missing card is the most abundant resource in our deck, I’m inclined to keep. Hopefully, the matchup is not fast so we can pass on turn 2 and combo with 4 mana sources potentially available for that turn. Waiting until turn 3 also has the benefit of requiring only one SSG out of you to pay for the Pact if you fizzle. Keep!
Example Hand #5: Game 2 OTD vs. an unknown after you killed your opponent on turn 1 and thus are in the dark (you have mulliganed to five)
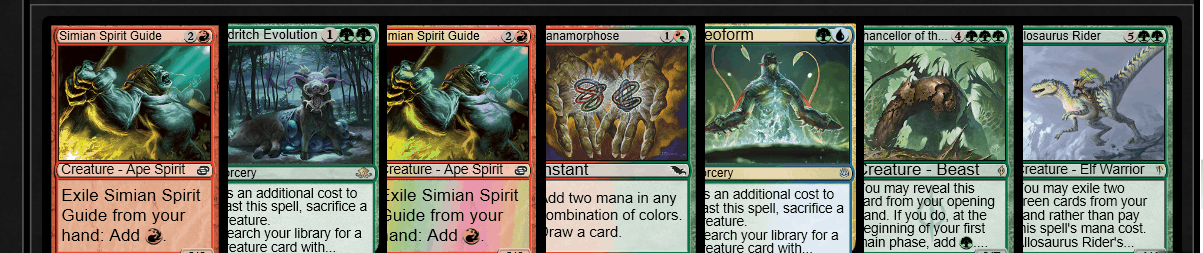
This would be a turn 1 combo even on a mulligan to 6, but alas we are not as lucky. I think this is definitely a keep. The question is, what would you put back? This is where killing in game 1 without giving your opponent a turn is a bit of a disadvantage (I know, tough life). I would consider the Rider and Neoform untouchable. If you keep the Chancellor, Manamorphose, and SSG as well, you have a potential turn 1 if you can Manamorphose into a green card in two draws (~84% to hit if ~60% of your deck is green cards). If you keep these cards, 13 untapped blue lands also become outs as you can simply pitch Chancellor and Manamorphose to the Allosaurus Rider and cast Neoform. As such, though the hand may not look like it on a mulligan to five, you are 95% to hit either of the outs in two draw steps and combo on turn 1! If I knew that my opponent was on a discard-heavy deck who has snap kept 7 (thus making turn 1 discard a certainty), I may consider shipping a Chancellor and keeping an Eldritch Evolution, but in the dark I think keeping the five on the right is a slam dunk. Keep, and ship back the Eldritch Evolution and SSG!
Example Hand #6: Game 1 OTD vs. an opponent who kept their seven.
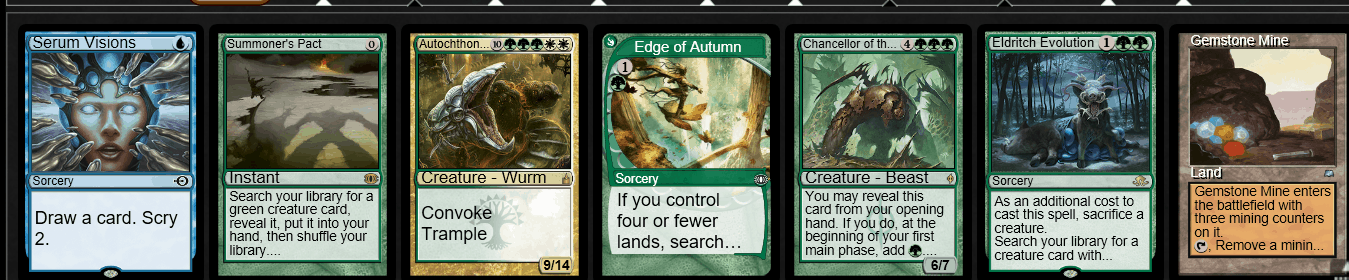
I’m a bit wary of hands who needs help to make a turn 3 Griselbrand on the draw in this metagame, but let’s evaluate this hand either way. The positives include having both an evolution spell and an Allosaurus Rider (notably, both are the worse halves of the respective card groups), more than enough green cards, and a Serum Visions to dig for our lands. Either a SSG or a Neoform would allow us to combo on turn 1 (though I am highly unlikely to try and combo on turn 1 with a SSG draw as you’ll need to pay for a Pact and comboing fully with 3 SSGs only is not something I actively want to do). So that’s 8 outs to a “dirty” turn 1 combo turn. If you miss and cannot use the Chancellor mana, then your hand becomes much worse as a hand that can’t produce a Griselbrand until turn 3 on the draw and need help doing so. Serum Visions will help us get a land/Neoform and Edge of Autumn can get us to three lands once we find our second, but one Visions is not a guarantee to find us a land by turn 2 (77% to do so with the draw step, three looks from Visions, and another draw step). Without Edge and Visions to bridge us towards the turn 3 combo in the fail case, I think this hand is a clear mulligan. As is, I think this is very, very close and it may depend on what my soul read is on my opponent’s deck.. Or just flip a mental coin. Either a keep or mulligan seems acceptable!
Example Hand #6: Game 1 OTD vs. an opponent who kept their seven.
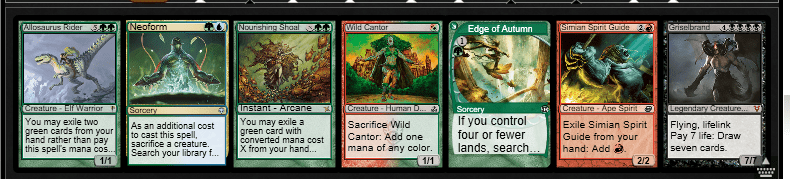
There’s a bunch of things to like and dislike with this hand. On the bright side, any land will let you combo off (14 outs). By my count, that’s 26%, 46% and 61% to hit by your turn 1, 2 and 3, respectively. It’s also true that this hand would be using an actual Allosaurus Rider, so won’t have a Pact obligation if you want to stop (if you fizzle or are up against Burn/Mono-Red Phoenix). On the other hand, having the Griselbrand means each draw has a small chance of losing you the game on the spot. You may also have to expend one of your Nourishing Shoals, which will make comboing tough. The numbers above also mean that 39% of the times, you’ll just sit there, twiddling your thumb, and dying a horrible death and look silly while doing so, and you don’t even have a land or a cantrip to start to help dig. Lastly, you having the Griselbrand means you may not be able to beat a single Path to Exile of Assassin’s Trophy because you won’t be able to re-evolve into a second Griselbrand. Ultimately, the format is so fast that I value the chance to produce a turn 2 Griselbrand on the draw, even if it is less than half the time. Keep… but prepare to brick and look silly!
Example Hand #7: Game 3 OTD vs. a Burn opponent who has kept seven. (this is your mull to 6)
This is an actual hand from what would be my win-and-in in the MCQ I played last month. Because they are on Burn, it’s likely that an active Griselbrand alone will let you win the game, but it needs to come down fast (turn 2/3 OTD/OTP). There’s definitely great appeal for this hand as a hand that can make a turn 1 Griselbrand on a mulligan to 6 already, but it would definitely be all-in. Given that you have an 8-outer on the draw, you are 28% to hit it in two draws. However, half of those outs (Summoner’s Pact) are actually dirty as it requires you to win on the spot, which is harder if Burn is on the play and will be pressuring your life total from the start. If I put a rough estimate and say I’ll be able to win 100% of the games I produce a turn 1 Griselbrand through Allosaurus Rider, but only 60% of the games I produce a turn 1 Griselbrand through a Summoner’s Pact, my EV here is roughly 14%*100%+14%*60%=22.4%. Now, do I think that my EV on a mulligan to five or lower is greater or less than 22.4%? It’s obviously harder to do these rough mental math on the fly, but looking back, I believe the answer is that I was better off taking a mulligan to 5 instead. As I said, the deck mulligans well down to five, and I feel like I’d have a better 5 enough times to muck this. Mulligan! (I ended up keeping this and bricked, losing the match and my top 8 aspirations).
TLDR: Be willing to mulligan a lot and aim for a hand that can/is close to cheating in a Griselbrand by the fundamental turn of the format/matchup (turn 2 OTD and turn 3 OTP being good benchmarks currently).
- Gameplay with Neoform
To simplify, the two key phases of the games with Neoform is pre-Griselbrand and post-Griselbrand. In a nutshell:
- Your Pre-Griselbrand phase’ main goal is to dig to produce a Griselbrand in the most efficient manner while playing around as much disruption as you can.
- For your post-Griselbrand phase, you are looking to combo efficiently until you win or you have reached an unbeatable state and mitigate all the downside cases that you are able to control. This doesn’t necessarily mean you always jam and go for broke, nor does it mean you palm 14 and pray/hope you hit your goods. In fact, you will have micro decisions facing you every draw 7, constantly asking questions such as “should I fire a Summoner’s Pact(s)?”, “when can I reasonably stop?” and “how many of the bottom X cards do I not have access to? What if my [key resource such as SSG/Lab Man/Shoal] are in the bottom X?”
Pre-Griselbrand Phase
Much of this will be your basic combo deck things, such as seeing the most cards in the window given, optimizing cantrips, etc. As such, I won’t state the obvious here, but share with you some of my findings specific to this deck that I’ve encountered
- A common spot that comes up is where you have 2 lands in play (including Waterlogged Grove), a third land in hand, and a rolled up Allosaurus Rider. In that case, do you crack the Waterlogged Grove on their End Step, or untap and draw (basically a question of do you want two shots at Neoform or 1 shot at Neoform or Eldritch Evolution? Generally, it’s correct to not crack the canopy land, as the odds of hitting a 4-outer in two draws vs. the odds of hitting an 8-outer in one draw is about the same, so you want to leave yourself the option of the third land being free to do as you please
- Often, you Serum Visions into a kill in hand and you think the scries are irrelevant. Instead, try and think of what are the ways this can go wrong from here. If you have two copies of Allosaurus Rider but only one Neoform, dig hardest towards the second Neoform in case your opponent casts a discard. If you are up against Burn/Red Phoenix and life total during the combo will be tight, dig hardest towards Nourishing Shoal.
- Generally, when presented with an option to fire a cycling card or a Manamorphose, I would aggressively fire it off at the first chance where I can draw into an immediate combo (for example, you have Allosaurus+2 green cards that are not Manamorphose, but no Neoform). If there’s no chance of comboing on the spot, then you may still want to fire it off for UG to dig into a SV/cycling card, but it may also be correct to pass and keep up pretenses if you think your opponent doesn’t know what you are on (for example, Island+Waterlogged Grove could theoretically be UG Merfolk).
- The most common color combination for Manamorphose is UG. This is because 1. UG makes Neoform mana and you can still cast a Serum Visions if you miss, and 2. When comboing, UG with 2 SSGs means that you can cast Laboratory Maniac with a Life Goes On up.
- There are some spots where it’s correct to Summoner’s Pact on your upkeep to thin the library and maximize your draw quality. This basically comes down to if you think this your last turn and you need to combo ASAP. In these spots, you typically would Pact for an otherwise non-functional card like Chancellor of the Tangle to thin the deck so your chances of hitting the card you need (Neoform, Nourishing Shoal) is maximized
Post-Griselbrand Phase
So you’ve managed to cheat in a Griselbrand.. Congratulations! You are well on your way to winning your game, but you still need to take great care in assessing your situation. I’ve had many people tell me about how they failed to combo after producing a fast Griselbrand. For most of them, there were ways you could mitigate the issue. Here are some common ones already:
- I couldn’t access the bottom 1-4 cards in the library due to having expended all of my cantrips, and all of my Nourishing Shoals/SSGs were there!
- I was feeling overconfident, and fired off all of my Summoner’s Pacts indiscriminately early in the combo. Now I can’t access the bottom 1-4 cards of the library!
- Laboratory Maniac was at the very bottom of the library, how unlucky! (this could’ve been prevented if he/she had an Allosaurus Rider and the mana for Eldritch Evolution)
- My library size was exactly 49, so I thought great I could go through ever card in the library! But when I drew my entire deck I couldn’t make blue mana for Laboratory Maniac because I had to pitch Wild Cantor to Allosaurus Rider, and Manamorphose with 0 cards in the deck is not advisable!
I’ve already gone through a lot of these through trial and error, so I’m hoping I can help you guys and gals not repeat my mistakes!
So you have a Griselbrand in play.. What do you need to be aware of to avoid embarrassing losses to fizzling?
Basically, after I cheat in a Griselbrand, these are the questions that I always ask first before I even draw my first 7 cards. By extension, being aware of these will help prevent many of these tragic fail cases:
- How many, if any, Pact obligations do I have for the next turn? If you have none, you have the freedom to stop any time. If you are already in deep with multiple Pact obligations, it may be right to just fire off the remaining Summoner’s Pacts to thin the library ASAP.
- How many mana sources do I have between SSGs, untapped lands, and Wild Cantor? This will greatly affect what you can do this turn. Note that you need 3 mana to cast Laboratory Maniac and thus this is the minimum amount that you need to win this game. Anything more gives you extra luxuries that will make comboing easier, such as being able to fire off Serum Visions or gaining 8 from Life Goes On.
- How many Nourishing Shoals do I have in hand? Starting with these cards will significantly improve your success rate.
- What is the maximum life points that I can theoretically gain this turn? This is especially relevant if you have had to pitch Nourishing Shoals/Autochthon Wurms/Life Goes Ons to Allosaurus Rider already.
- Do I already have access to Laboratory Maniac? This can come in the form of drawing them, or having an Allosaurus Rider plus an Eldritch Evolution (but not Neoform!!)
- What is the library size X? How close is X to being divisible by 7? As you draw in increments on 7s, knowing this will inform you on how aggressive you can manage the library size..
- How many ways do I have to manage the library size for free? For example, in my current list, I have 4 Manamorphose, 1 Edge of Autumn, and 4 Summoner’s Pacts. Some lists play Street Wraiths too. So for example, if I have 6 cards remaining in the deck and you don’t have any spare mana, it may be possible that your 4 Manamorphose and 1 Edge of Autumn cannot get you to the last card, which may very well be the SSG that you need. This is preventable though – if you had cast a Summoner’s Pact very early, then the library size would’ve been N/7+5, not N/7+6, and thus your free cantrips can go through the entire library. As you will see, your Summoner’s Pact usage can greatly affect your combo success rate.
Using Summoner’s Pacts correctly.. The secret MVP of the deck
This card does so much more than meets the eye. Here are some of the ways I’ve used it for:
- Pact for Allosaurus Rider to start the combo
- Pact for Autochthon Wurm to ensure your Shoal gains 15
- Pact for Wild Cantor when you only have 1 SSG and need to keep the combo going, so you can filter your SSG into G for Life Goes On, gain the life, and continue drawing
- Pact for an irrelevant card on Upkeep because you know exactly what you need to draw (likely Neoform) and/or because you believe this is the last turn
- Pact for whatever before your first draw 7 when your library size is at 48. The next closest X/7 number is 42, so you can afford to Pact early to try and improve your draws by thinning the deck
- In general, Pact mid-combo to manipulate the library size
- Pact for Allosaurus Rider to cast because your opponent has Pathed your Griselbrand on sight, and you can still win by beating down with an army of free 5/5s and you can pay for this Pact.
As you can see, the possibilities are endless!
Thinking of your combo turn as a constant stream of decision tree branches
The fun thing about comboing with this deck is the non-slam dunk (where you have 2 Shoals and 2 Wurms in the first 14 cards) combo hands are dynamic and you can do a lot to maximize your chances. Here’s a summary of what I have in mind:
- There are some times where I can try and combo, but decline to and just pass and ensure an extra land drop next turn. This can happen when your opponent is on a deck that can’t punish you immediately and the chance of you dying to your own Pact is higher than the chances of your opponent killing you in time.
- Consider a hand against a Tron opponent of [Summoner’s Pact, Manamorphose, Life Goes On, Neoform, Waterlogged Grove]. You are on your turn 2 and can play the Waterlogged Grove and try to combo. Your Tron opponent has gone turn 1 Forest->Stirring for Map, turn 2 Mine->cast Map and a Chromatic Sphere. They can’t do anything bad to you next turn, and you could use the extra land drop to significantly reduce your fail rate. Therefore, you make your land drop and pass.
- Early in the combo, if you are forced to go for it this turn (you had to expend a Summoner’s Pact and a Pact of Negation and are dead next turn), you can fire off your Summoner’s Pacts more freely before your first 7 to optimize the library size
- If you aren’t constrained by these factors, my philosophy is to hold off on the “potentially lethal” (using Pact or SSGs preemptively) actions to the last possible moment. Like in poker, position is key and you want as much information as possible before you make these critical decisions
- Against some decks, it’s possible you can stop early. The general rule of thumb is that if your opponent’s best possible turn next turn can’t kill you, err towards stopping rather than firing off a Pact you can die to. This is also matchup dependent, as some decks actually cannot beat a 8/8 Flying Lifelinker. Some examples:
- You are on the play on turn 2, against Burn/Red Phoenix, and your first draw 7 which takes you down to 11 contains no good cards, it’s likely that you should just stop and pass (assuming no Pact triggers).
- You are against Jund or Hogaak post-board on your turn 2. You aren’t facing significant pressure but your first 7 cards only yielded a SSG, Wild Cantor, and Veil of Summer. In that case, the worst they can do to you is to either Liliana Edict or Assassin’s Trophy on Griselbrand. In that case, play out your Wild Cantor and pass, knowing that you are protected by the Veil against the worst that they can do.
- You are against Tron and they cannot produce Tron+Karn Liberated or Karn, the Great Creator+something harmful next turn. You’ve Pacted once, have 2 lands in play and 2 SSGs. You are totally OK to stop here and finish the job next turn while paying the Pact.
Miscellaneous pointers
- You can Eldritch Evolution your Allosaurus Rider into Chancellor of the Tangle. Sometimes, you need that immediate blocker/Vigilance attacker to win a race and it’s sometimes better than your Rider
- If you are short one card for the win but have Laboratory Maniac out, I’ve also won with some Pact triggers on the stack by untapping and cracking my Waterlogged Grove on Upkeep to draw a card from an empty library
- Winning through a removal on Laboratory Maniac is pretty trivial, even if it’s uncounterable like Abrupt Decay. Just maneuver your draws such that you can layer as many draw effects as possible. This can mean managing your library size to be 0 before you cast Laboratory Maniac, casting your life gain spells before you play Laboratory Maniac to re-activate Griselbrand, making the right colored mana before playing the Maniac to cast Serum Visions/cycle, etc. You cannot beat a Wipe Away though, but if you really suspect that go ahead and beat down for the win instead.
- You can win with just Allosaurus Rider beats. Always be on the lookout for an opportunity to do so!
Conclusion
As I’ve outlined, the deck’s extremely powerful but the combo can definitely fizzle due to pilot error. Hopefully, what I’ve shown here can save hopeful Neoform pilots from making the mistakes that I’ve already made! In the last part of the primer next time, I will go through a sample game walkthrough where we can apply these concepts, as well as the coveted #sbguide. Until then, keep on turn 1ing!